


Have you ever wondered why in the world your poor little Peas look so dejected? Only knee-high, already blooming, with scant pods to eat following?
Well, when did you plant them? Was is mid-May, was it JUNE?? That’s quite late actually. Peas like the cool temperatures of early spring to grow and thrive. Plant them NOW for best results. I’m speaking to those in the Northern Regions, USDA agricultural zones 3-7ish—those of us growing in pronounced seasons of Winter, Spring, Summer & Fall.
The following is how to direct-seed (DS) sugar-snap Peas (can also do for any other variety of a edible pod Peas, like Snow) + how to sow them in flats if you and your garden beds are simply not ready yet.
^^ Not to brag, okay, yes I am…my Pea patch in Skagway Alaska’s Community Garden were always the best looking & most productive…saved seed since 2006 too!
Sugar snap peas are one the ‘earliest’ food crop to plant. They do best direct-seeded into the garden in early Spring, when soil is moist and cool.
I follow this rule of thumb: in early Spring, once the snow has melted off and I can put my finger into the dirt one inch deep, it’s time to plant the Peas. Plant Peas 1” deep.
Generally, this lands in early April. The earliest I’ve seeded Peas is March 31st (2016) in Alaska. They like the cool weather to germinate and grow. In cooler, more moist regions, with access to good sunshine, they thrive. They don’t grow nearly as lush and prolific in the higher heat of the MT West, but I’m still trying.
Ideally, you’ll have your bed prepped for pea seeding in Autumn, with your trellis firmly in place. Well, even I usually miss that boat. I tend to have the soil ready, but not the trellis. When this occurs, I will give the bed a re-shape and plant the Peas—after soaking for 8-24 hours! This helps them swell to break the seed coat! Seed in a triple row, seeds 2-3” apart. I’ll know approximately where my trellis sticks will go, so the Pea roots aren’t as disturbed during construction.
It’s important the trellis structure is firmly placed, so it doesn’t blow over in the wind, or shift out of place when there’s a lot of moisture. Always put your poles/posts plenty deep. Push the dirt in with your feet, compacting that spot in order to anchor in the base of your trellis.
I used drift wood for most of my trellising, as I liked the look, and it was easy to find when living near the ocean. Nowadays, it’s made of fallen Willows and random long sticks I encounter in the woods. You can use metal fencing posts, with string between, or even chicken wire to help support. A sturdy, movable A-frame structure made with 2X2” and 2X4” lumber is another option. This option is a lot of work in the beginning, but sturdy and reusable for years if taken care of.
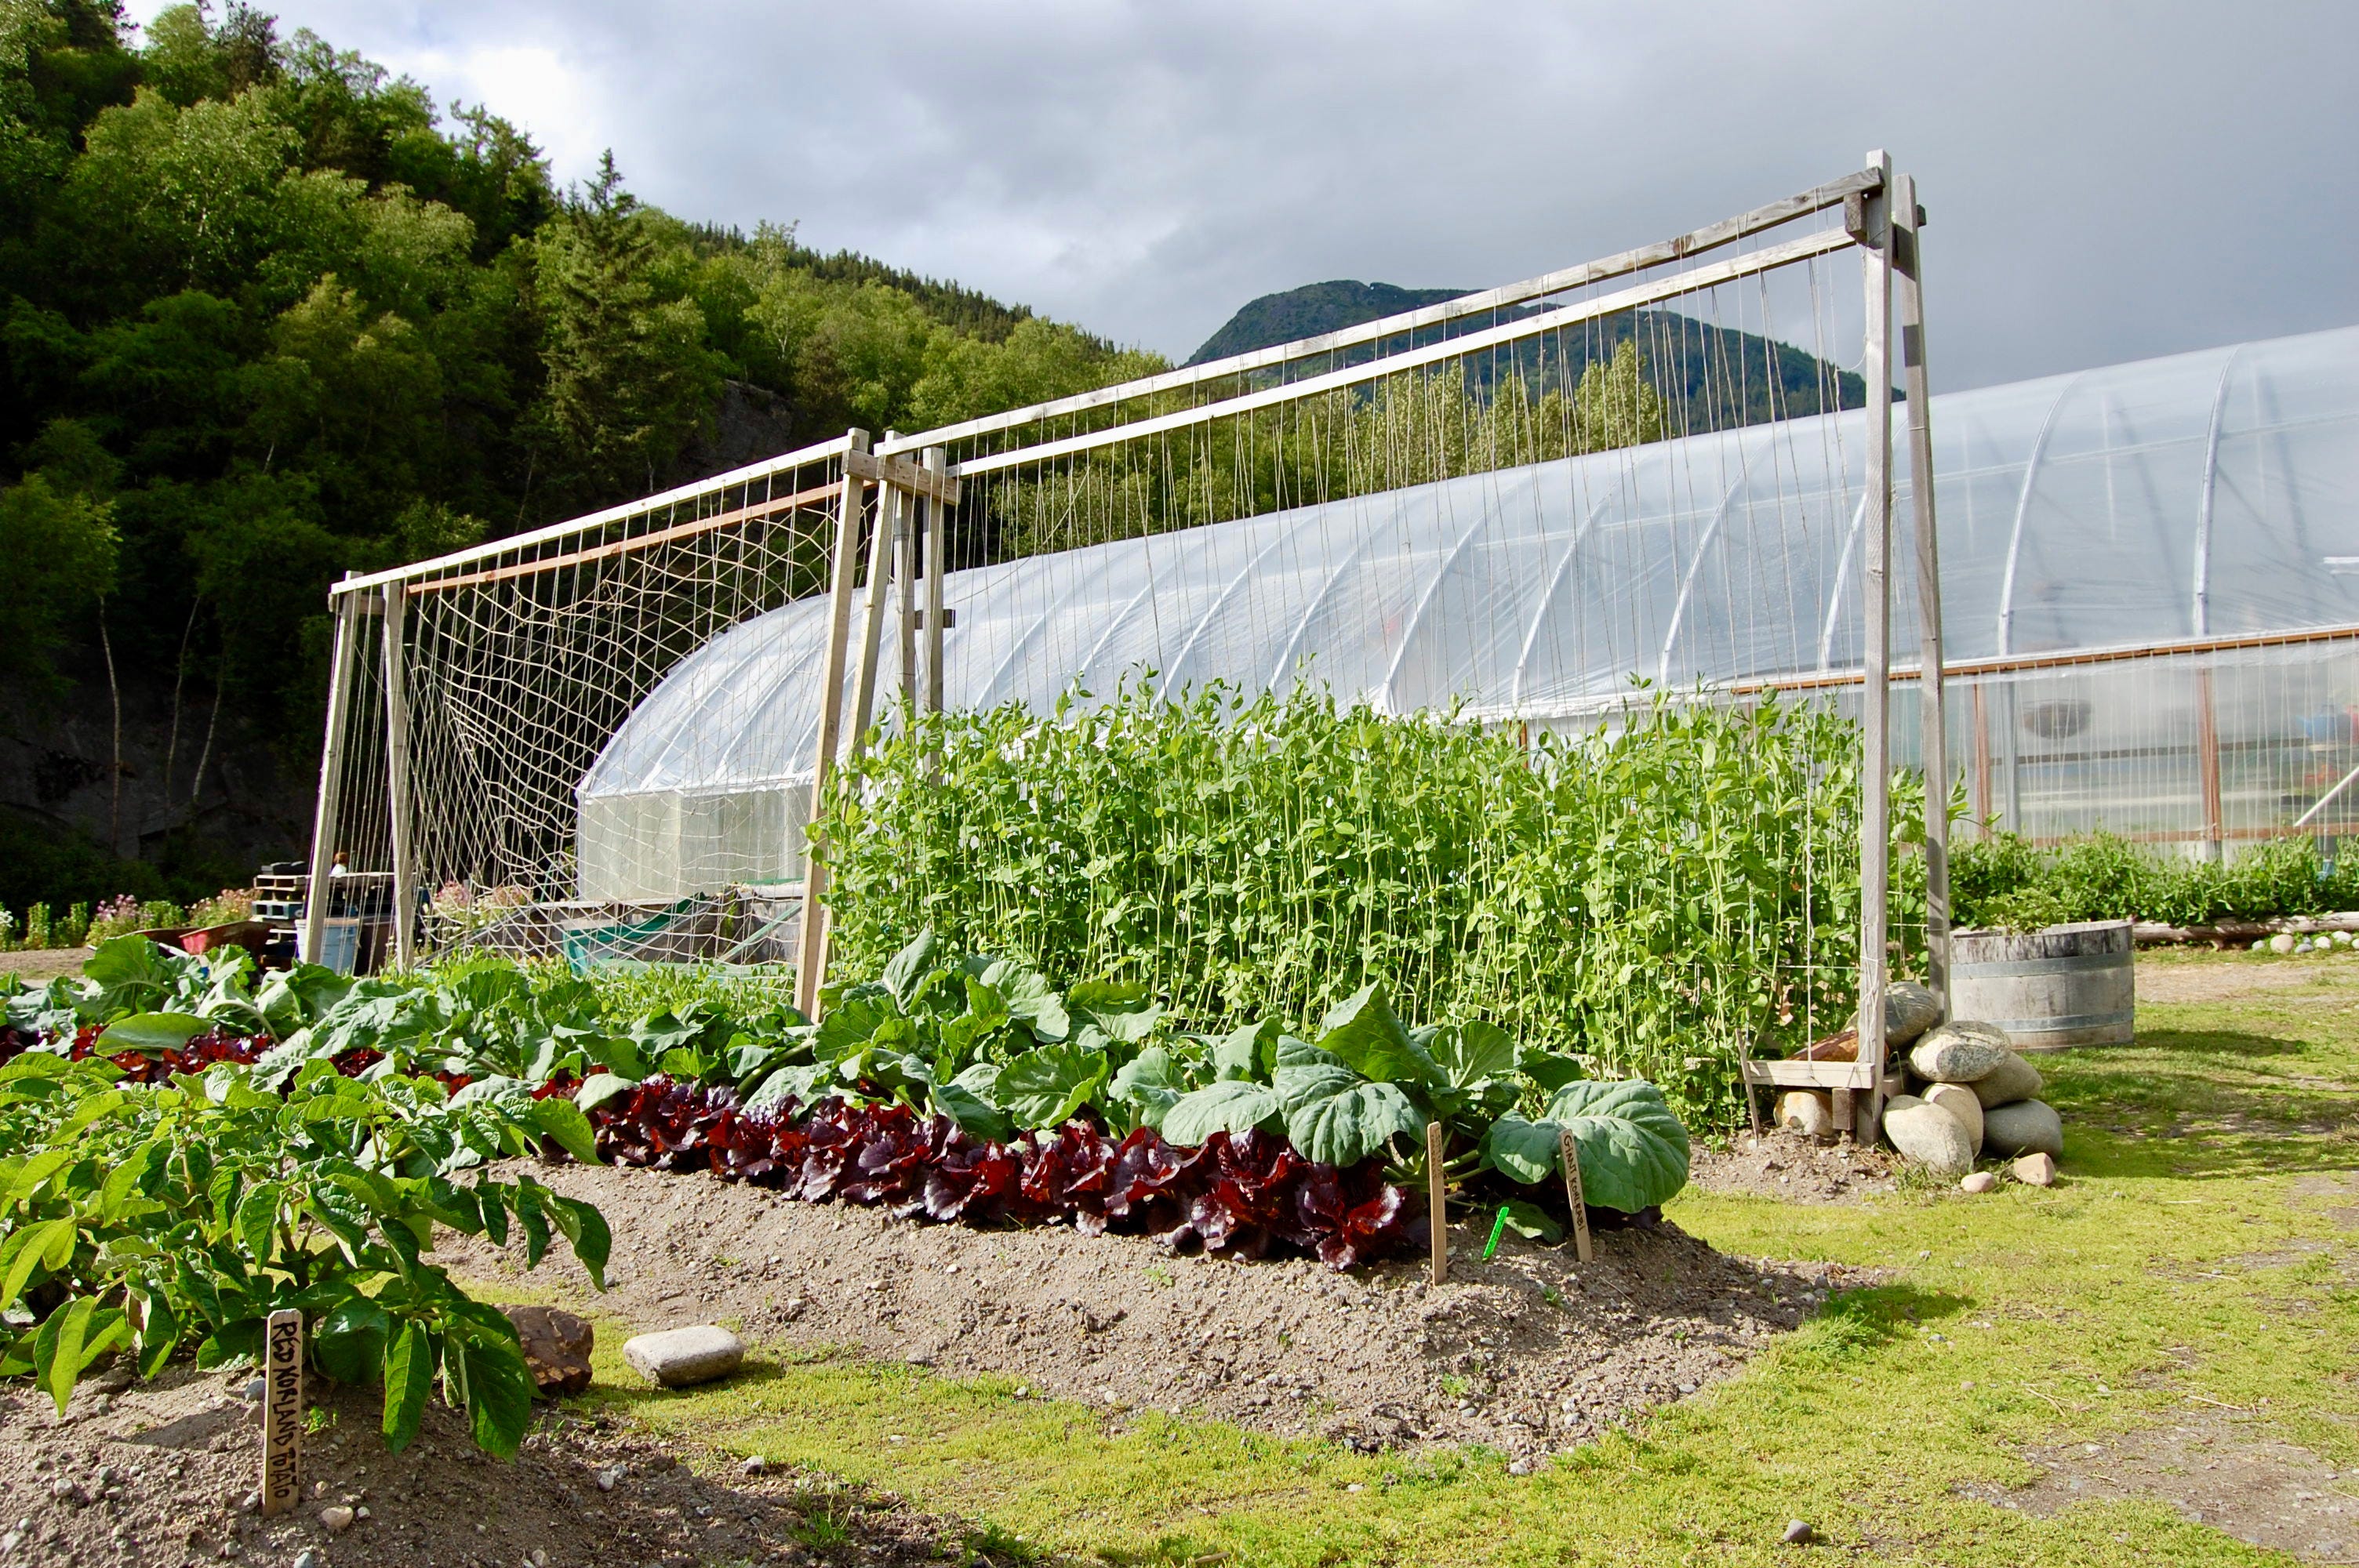
^^ Note the rocks at the end of the bed — this helps anchor down the trellis. This one should have had longer ‘legs’ in order to go further down into the soil. High winds will knock down your trellis if you’re not mindful! Make sure it’s sturdy.
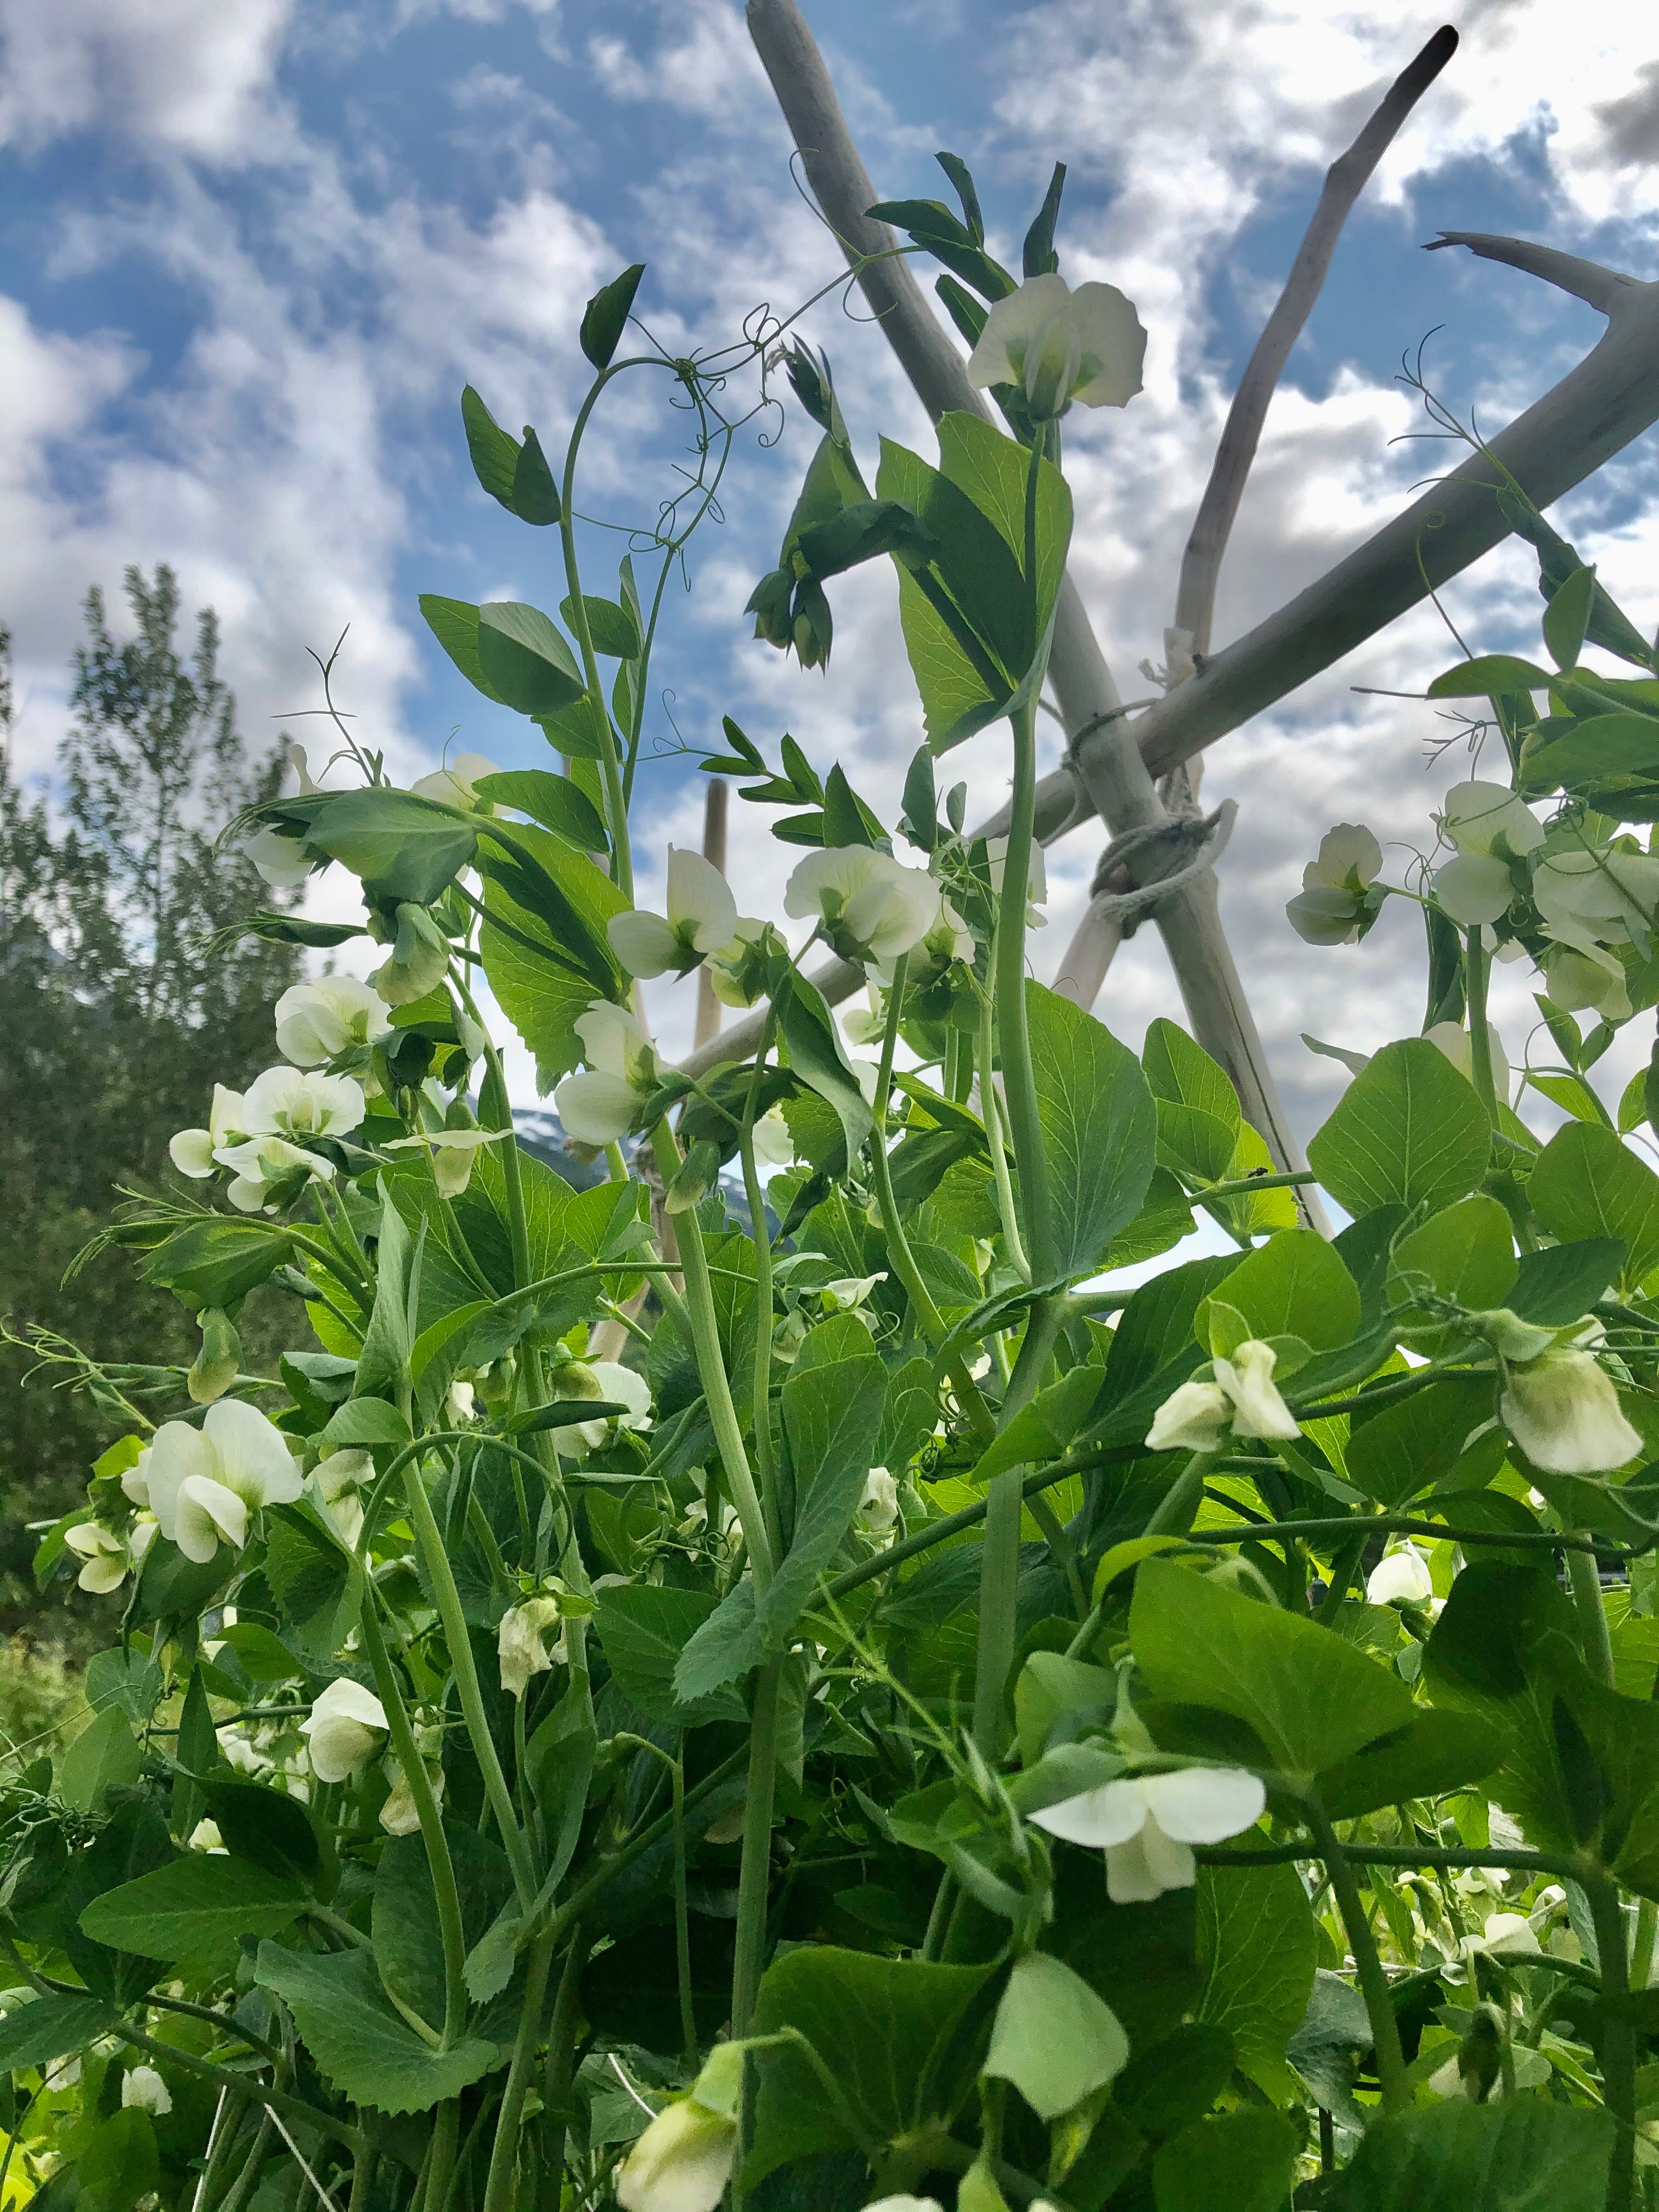
Height of your trellis is important. If it’s only four feet high, you’ll most likely have Peas growing up and over and drooping down if you’ve planted them timely. In Alaska, I went about 6-7’ off the ground; here in Idaho, it’s more like 5-6’.
Peas grow with tendrils wrapping around whatever is nearby to help support themselves as they reach for the sky. If you grow peas without a trellis, they will grab each other for support, and over time get so heavy they flop over. Tying string between sticks or fence posts gives the tendrils a place to attach.
Planting Peas
After soaking overnight or up to 24 hours, (not necessary, but speeds up germination) seed directly into the ground. I like to make a flat trench about 4” wide. And I’ll do 2-3 ‘rows’ per trellis bottom. Usually 3 rows, with seeds spaced 2-3” apart, 1” deep. Alternating space, create diagonal lines with the seeds.
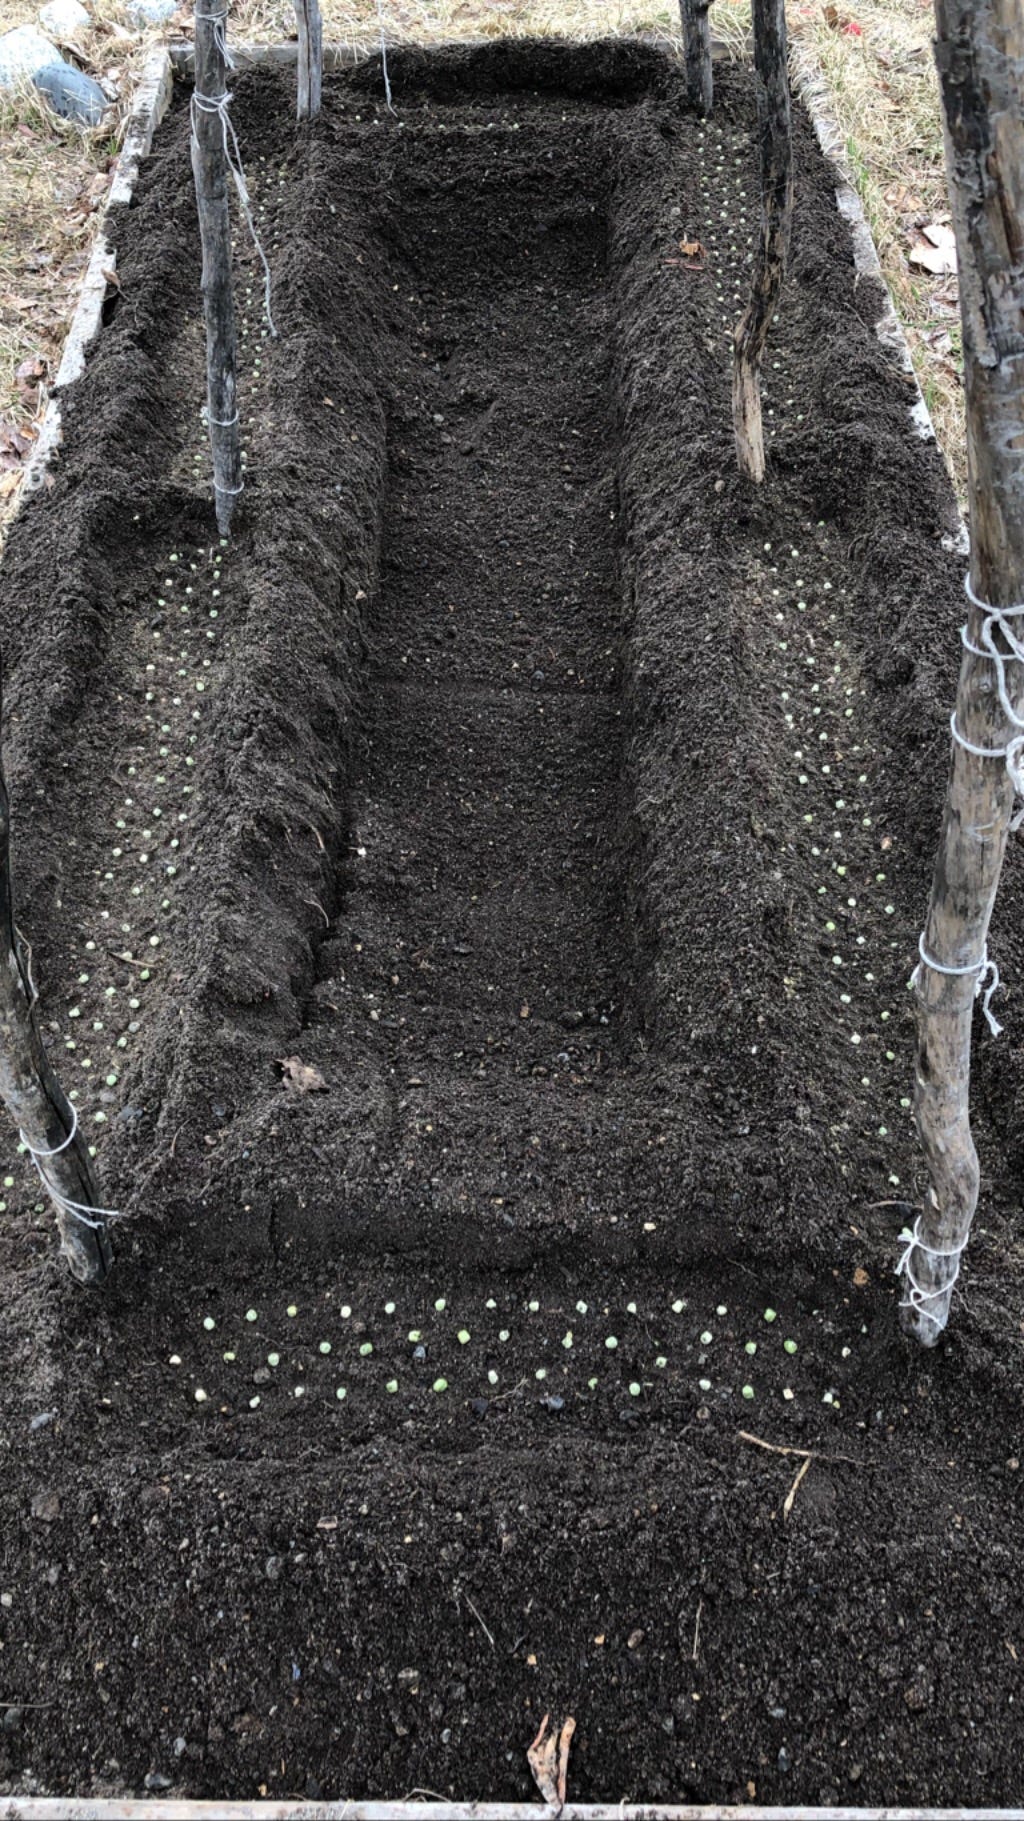
^^ After covering seeds with soil, I’ll add leaves &/or seaweed to the middle of the bed. This adds nutrients as it breaks down and prevents weeds. Alternatively, you can seed a quick growing crop like Radishes or Mesclun Mix greens ~ but remember, the Peas will soon grow taller and you won’t be able to reach that middle spot!
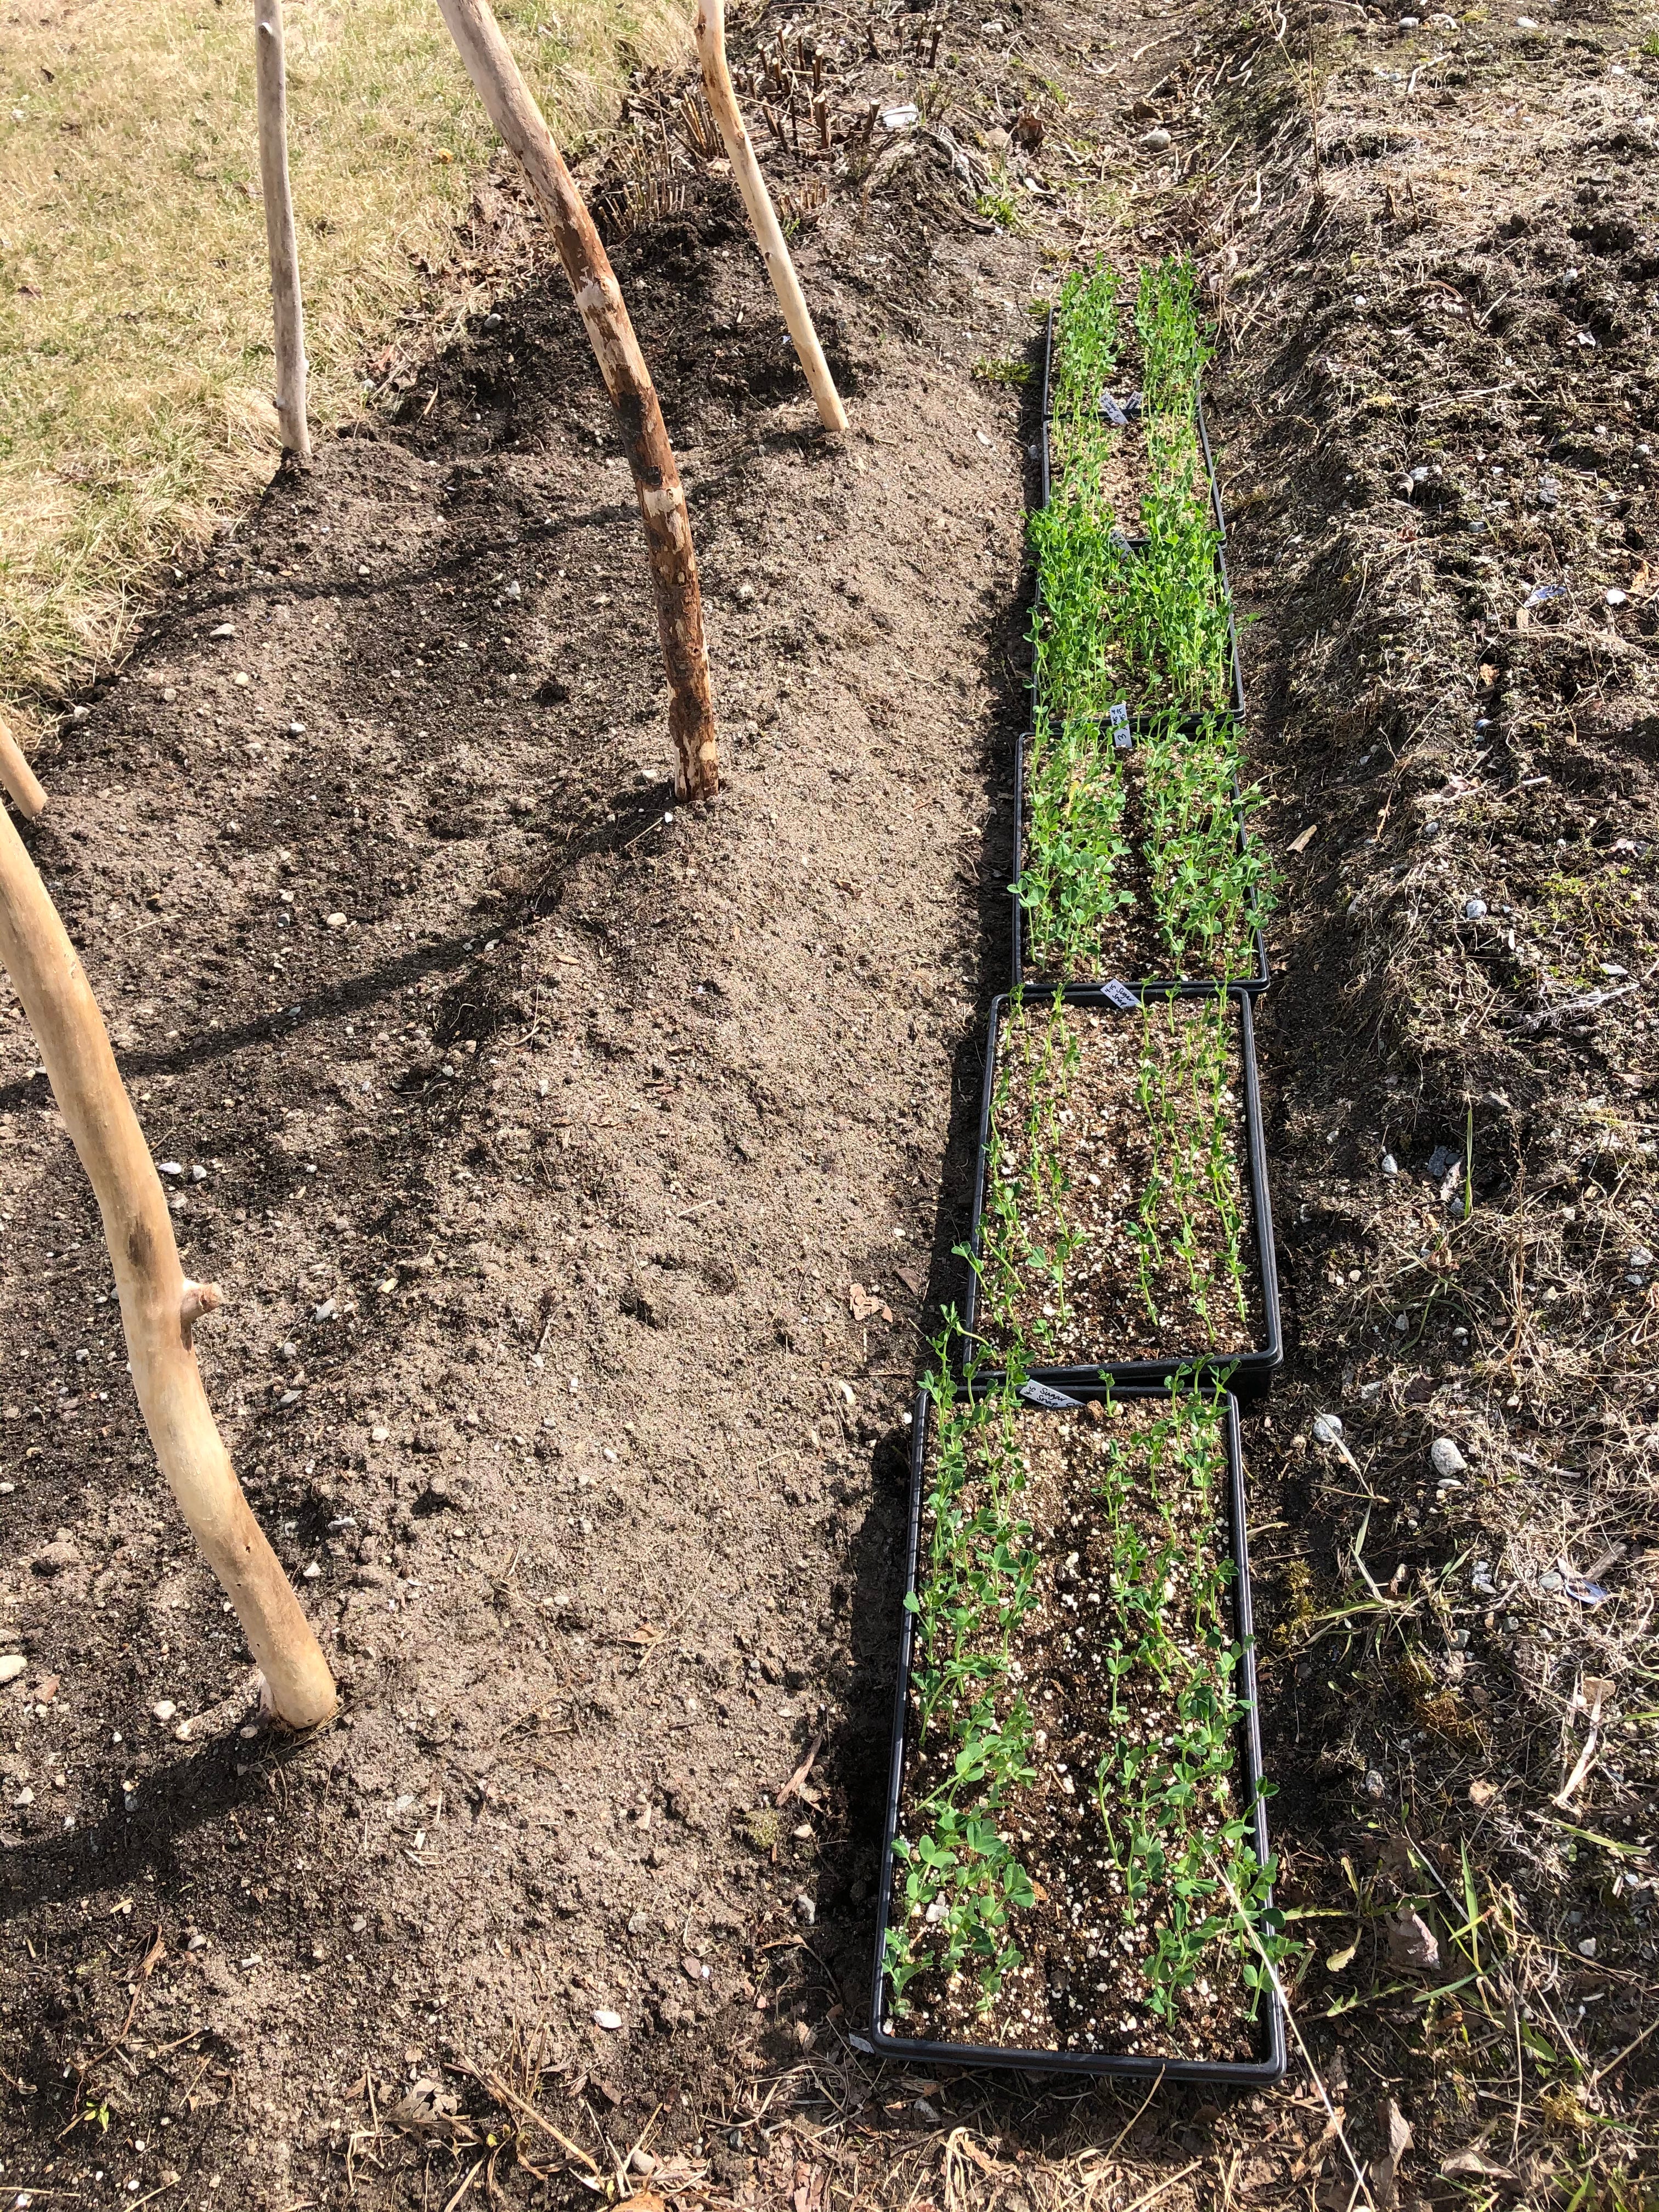
So, what happens when your Pea spot is weedy, maybe it’s not even made yet, and you still have to prep it?
Start your Pea seeds in flats!
✦ How to Successfully Transplant Peas ✦
YES! You may have read or heard that one should always direct seed Peas…well, you CAN transplant Peas! And here’s how:
1) Soak your Pea seeds overnight or 24 hours.
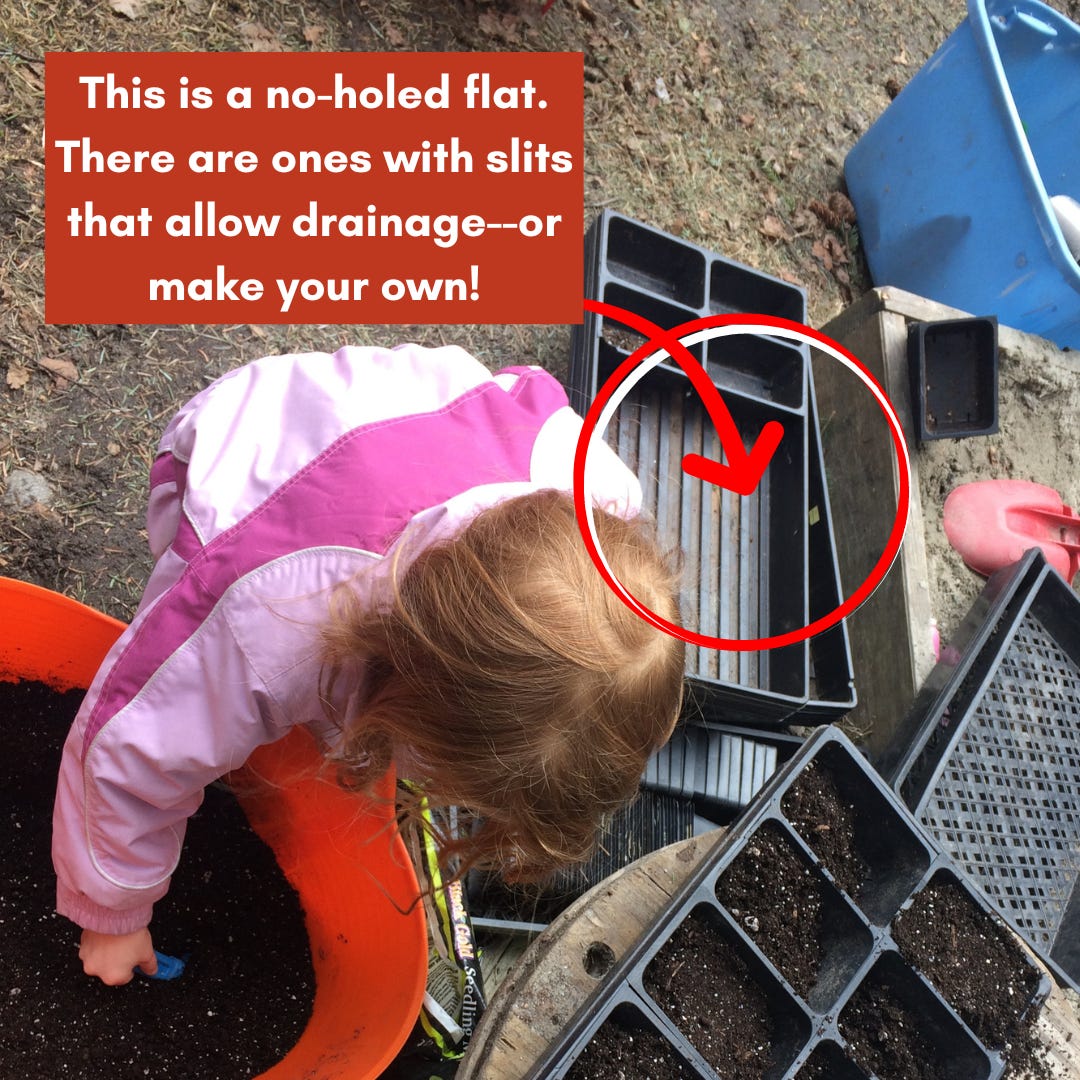
2) Put soil mix into a HOLED, no-holed flat. You want drainage. Some come like this. Alternatively, using a knife, poke holes into the bottom of a no-holed flat. This would be nested into a no-holed flat, or a shallow bin if bringing indoors. Wooden boxes would work for this too, particularly in a greenhouse setting and outside use. You want a decent amount of room here; Peas don’t like having their roots fussed with!
3) Divide the space in half by gently pressing the soil in with the side of your hand, going lengthwise. This will make 2 sections. Left and right.
4) Seed the Peas as you would if direct seeding. Follow packet instructions or seed 3 rows, seeds spaced 2-3” apart. An inch deep.

5) Cover with soil mix. Water in gently.
6) A plastic lid will keep moisture in and warm the soil. You can bring indoors for quicker growth. No heat mat. OR, leave outdoors, sun/part shade. Check if super sunny, remove lid if using, replace at night. Pea seeds can take a frost, but if it goes below 30F I’d bring them inside.
7) PREP the garden soil for Peas. A little all-natural fertilizer is nice. Peas are a fruiting crop so higher on the phosphorus content than nitrogen (N-P-K)*. Mix fertilizer into soil (always!) Dig a trench—centered under where your string will go—at least as deep and wide as your section to be transplanted is. A little lower is okay to encourage water retention. Place the ‘bones’ of your trellis. (After seeding or transplanting, weave string or place fencing/wire.)
8) TRANSPLANT about 4 weeks or so past seeding. Cloudy days are best. Or early morning, late evening. Growth rate depends. We want shoots about 2-3” tall, nice and sturdy with robust roots.
9) HARDEN OFF. If you’ve been growing Peas indoors (home or greenhouse) be sure to harden them off. A week is ideal, at least 2-3 days in a pinch.
10) Take a sharp knife and cut down the center of the flat. Per step #3. You may cut through some roots. That’s okay. Nice and smooth.
11) Treat it like a cake. Take a butter knife and gently edge between the soil mix/Peas and the flat, loosening the soil from container. You’re creating two long sections per container to plant into the garden. Now if the peas are falling apart in the soil, it’s too soon. If the peas are super pot bound (you see mostly roots and not much soil in-between), they won’t grow as well. Timing is crucial.
12) Carefully (again, the cake analogy) lift one section at a time, and place into the prepped rows. Each section should lift out in its entirety. Plant level with existing garden soil, or plant slightly lower, to hold more water. Unlike many starts, don’t fuss with Pea roots to encourage outward growth during transplanting.
13) Gently press the garden soil into the Peas. Water in; using a natural liquid fertilizer like AK Fish fertilizer (5-1-1) or Maxicrop (liquid seaweed) is nice here. I once read that seaweed was helpful for Plants as it increased their tolerance to cold. Seemed to work for me in Alaska!
14) Peas can take a light frost. However, if freshly transplanted and frost might occur, cover with frost protection fabric just in case.
15) Now’s a good time to string the trellis or attach wire, etc. If in a time-crunch, string trellis at least 10” high, after transplanting. Peas grow quickly, and having support for them right away, ideal. You can return to finish stringing as needed.
*Know your fertilizer NPK. This cute little ditty below came from @Pawpawridge via Instagram.
Sing with me! “Up, Down, All Around, Up, Down, All Around!”
N- Nitrogen- Up- Greens Up the Plant- Leaves
P- Phosphorus- Down- Builds strong roots and promotes blooms- Roots and Fruits
K- Potassium- All Around- Helps build ALL of the Plant.
Okay, so that was a lot of instruction just to plant some Pea seeds.
I share this because oftentimes you’ll read that Peas can’t be transplanted. And they can. Lots of Garden Rules can be bent. This is one. Beets are another.
And I’ve heard of planting carrots into toilet paper rolls, using those as pots…that seems rather ridiculous, but illustrates the many variations of growing! And you might find your own variation of this method, that’s the beauty of gardening, it’s always subjective to the person, the place, the thoughts & beliefs!
Place Peas in a sunny spot for good pod production. They will take some shade, but need a good 5+ hours to produce fruit. For hot summer regions, morning sun is better than afternoon sun. The early morning rays are cooler than late afternoon sunbeams. Stand outside in your yard, where you’ll be placing your Plants, and notice the temperatures of a rising sun versus the setting sun. Next to house in particular if you’re growing there as buildings help to retain and throw back heat. This can be to a Plant’s benefit or demise depending on what conditions they prefer. In cooler summer regions, full sun for Peas is ideal.
Avoid transplanting during the heat of the day.
This goes for all transplanting, not just Peas. Yes, it’s during those beautiful warm, sometimes hot, Spring days when we want to be planting outside in the garden…save that time for weeding, prepping beds or direct seeding. Cloudy, misty, gently raining days or best for transplanting. Early AM or late PM are second best choices. If it’s going to be a really hot day, I’ll chose the nighttime planting because then the Plants have a whole evening to acclimate.
I direct seed RADISHES right around the same time as I plant Peas. Mid-April was my go-to time period in SE Alaska. I’m still learning the Mountain West time frames, but it’s similar. Radishes and other cold-hardy greens like Mustards, Spinach, Red Mt. Orach, Kale, Collards and the like all enjoy the cooler soil temps and will readily sprout. You do want to be mindful of hard frosts when they are young. Having that frost protection fabric comes in handy this time of year!
I hope you gained some good tips from this share :) Gardening is a rewarding, fun and fruitful way to spend time ~ and it’s nice to actually receive harvests from your efforts! Thanks for reading!